ExifTool is one of the best programs for editing image metadata. However, it is a command-line utility, which means that it may be difficult to use for those unfamiliar with commands/CLI. ExifToolGUI bridges the gap by providing a GUI (graphic user interface) that makes many of ExifTool’s most useful features easily accessible.
Tag Archives: Images
How to Extract Images from Swf Files
You will need: Firefox, Adοbe Flash Prο and Phοtoshop (or an image converter)
1. Using Firefox,1 open and save the web page with the flash protected images as Web Page, complete (*.htm;*.html).
How to Fix Horizontally or Vertically Distorted Images
Occasionally, images may appear horizontally or vertically stretched in Windows Photo Viewer.1 One possible explanation for this is that somewhere along the way the images’ metadata for their x and y-resolutions became corrupted. In order to correct this, you need to edit the images’ metadata. ExifTool is one of the best programs for editing metadata.
How to Edit Image Metadata with ExifTool
1. Download ExifTool. If you don’t know Perl (a programming language), I recommend downloading the stand-alone Windows executable, or the Mac OS X package if you’re a Mac user. ExifTool is lightweight (3.5 MB) and portable, so you don’t need to worry about it cluttering up your system.
Optimizing Photos for the Web
- Edit image.
- Resize image.
- Sharpen small (≤ 500 px in width) images with the Unsharp Mask and larger images with the High Pass Filter.
- Reduce noise.
- Make the file size smaller by using Photoshop’s “save for web & devices” option. The difference between jpeg high (60), jpeg very high (80) or jpeg maximum (100) is barely noticeable. I usually save small/medium images as jpeg high and large images as jpeg very high. Make sure the convert to sRGB box is checked.
How to Sharpen Images
Image Credit: Flickr Creative Commons. By alltagskunst
How to Sharpen Photos: An Introduction (Easy)
Read More: http://digital-photography-school.com/an-introduction-to-sharpening-photos
Summary:
1. Sharpening should be done at the end of the editing process.
2. Create a flattened version of the image either by flattening or merging all the layers. The Unsharp Mask works only on the current layer.
3. Use the Unsharp Mask (Filter > Sharpen > Unsharp Mask).
4. Note: There are other sharpening tools available which do an even better job of sharpening than the Unsharp Mask. Use the Unsharp Mask method primarily for small images (i.e. 500 px).
Resizing (Resampling) Images
Image Credit: Flickr Creative Commons. By lirontocker
Resizing vs Resampling
Usually, when people use the word resizing, they actually mean resampling. Technically, resizing means changing the ppi (pixels per inch), or the resolution, of your images. Resolution and ppi become significant when you wish to print photos. For example, let’s say you have a 12 megapixel camera. This means the photos you take will have 12 million pixels (4,000 pixels by 3,000 pixels). If you want high quality prints, your photos should have a resolution of 240-300 ppi. At a resolution of 240 ppi, your photos will print at a size of 16.6 inches (4,000/240) by 12.5 inches (3,000/240). At a resolution of 300 ppi, your photos will print at a size of 13.3 inches (4,000/300) by 10 inches (3,000/300). Notice how the print size of photos decreases as the ppi increases. Changing the ppi of images will change the sizes the images will print, which is why it’s referred to as “resizing.”
How to Fix Blurry Images in WordPress
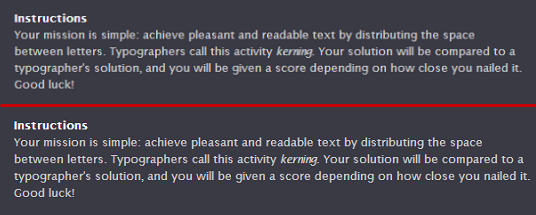
The image on top is a screen cap of how the Instructions.png appears in a WordPress post when its width is 570 pixels. The image on the bottom is a screen cap of how the Instructions.png appears in a WordPress post when its width is 565 pixels.
You may have noticed that your images sometimes appear blurrier when posted in your WordPress blog. It’s not very noticeable for photographic images, but it becomes very noticeable for line or text images.
I was confused as to why this was happening because, having read that WordPress was a poor image resizer, I made sure to resize my images before uploading them. According to WordPress, the maximum content width for my theme,Twenty Eleven, is 585 pixels. However, even though my images were resized to 580 pixels in width, they still appeared blurry in my WordPress posts. Interestingly, though, when I visited the direct links of the uploaded images, they appeared crystal clear.