ExifTool is one of the best programs for editing image metadata. However, it is a command-line utility, which means that it may be difficult to use for those unfamiliar with commands/CLI. ExifToolGUI bridges the gap by providing a GUI (graphic user interface) that makes many of ExifTool’s most useful features easily accessible.
Category Archives: Tech
How to Extract Images from Swf Files
You will need: Firefox, Adοbe Flash Prο and Phοtoshop (or an image converter)
1. Using Firefox,1 open and save the web page with the flash protected images as Web Page, complete (*.htm;*.html).
How to Make and Format E-books

Image Credit: Flickr Creative Commons
Required Programs: Microsoft Word (recommended), Calibre (recommended), Sigil (optional)
1. Open the document you want to convert into an e-book.1
2. If the text in your document has been encoded in a code page other than Unicode, copying and pasting the text into a new MS Word document and saving it will automatically re-encode the text as Unicode (source). Skip this step if your document is already in Unicode.
Steps: Select all the text (CTRL+A), copy (CTRL+C) and Paste as HTML Format. The reason I wouldn’t recommend Paste Special > Unformatted Unicode Text or Unformatted Text is because it can create really messy html code.2
Read Along in Korean with Text-to-Speech Software
Topographic Text Image Credit: http://chronotext.org/Isaiah
I recently started reading Korean articles and was kind of amazed by how quickly my grasp of Korean grammar, syntax, and spelling improved. Then again, my Korean grammar and spelling fundamentals are so weak and shaky that they’re bound to be fortified by any sort of exercise or practice. I mean, if you don’t even know the Korean rules for spacing,1 then it’s kind of a given you’ll catch on simply by looking at Korean sentences, by osmosis. However, I’m still convinced that reading Korean is the quickest and surest way to become proficient in Korean. After all, reading is the primary way people become better writers, build their vocabulary, learn grammar (in the case of lousy public schools), etc.
How to Fix Horizontally or Vertically Distorted Images
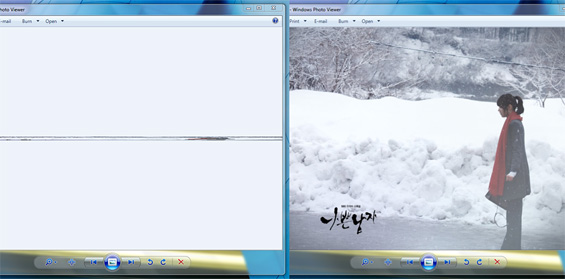
Occasionally, images may appear horizontally or vertically stretched in Windows Photo Viewer.1 One possible explanation for this is that somewhere along the way the images’ metadata for their x and y-resolutions became corrupted. In order to correct this, you need to edit the images’ metadata. ExifTool is one of the best programs for editing metadata.
How to Edit Image Metadata with ExifTool
1. Download ExifTool. If you don’t know Perl (a programming language), I recommend downloading the stand-alone Windows executable, or the Mac OS X package if you’re a Mac user. ExifTool is lightweight (3.5 MB) and portable, so you don’t need to worry about it cluttering up your system.
Compilation of Useful Photoshop Tutorials
How to Blur Backgrounds
- Blur Those Backgrounds in Photoshop
- Easy Depth of Field Effect in Photoshop
- Simulating Depth of Field (Aperture) with Photoshop
How to Use the Clone Stamp Tool
“Clone” or replicate parts of your image.
Summary:
1. Set the hardness to 0%.
2. Hold down Alt key and click the area of the image you wish to “clone,” then release the Alt key. This sets the source point.
3. “Paint” with the cloned pixels. Deselect the aligned option if you would rather paint with the clipboard source point than continuously clone the aligned source point.
4. Alt-click a new area to set a new source point.
Optimizing Photos for the Web
Optimizing Photos for the Web
- Edit image.
- Resize image.
- Sharpen small (≤ 500 px in width) images with the Unsharp Mask and larger images with the High Pass Filter.
- Reduce noise.
- Make the file size smaller by using Photoshop’s “save for web & devices” option. The difference between jpeg high (60), jpeg very high (80) or jpeg maximum (100) is barely noticeable. I usually save small/medium images as jpeg high and large images as jpeg very high. Make sure the convert to sRGB box is checked.
How to Sharpen Images

Image Credit: Flickr Creative Commons. By alltagskunst
How to Sharpen Photos: An Introduction (Easy)
Read More: http://digital-photography-school.com/an-introduction-to-sharpening-photos
Summary:
1. Sharpening should be done at the end of the editing process.
2. Create a flattened version of the image either by flattening or merging all the layers. The Unsharp Mask works only on the current layer.
3. Use the Unsharp Mask (Filter > Sharpen > Unsharp Mask).
4. Note: There are other sharpening tools available which do an even better job of sharpening than the Unsharp Mask. Use the Unsharp Mask method primarily for small images (i.e. 500 px).
Resizing (Resampling) Images
Image Credit: Flickr Creative Commons. By lirontocker
Resizing vs Resampling
Usually, when people use the word resizing, they actually mean resampling. Technically, resizing means changing the ppi (pixels per inch), or the resolution, of your images. Resolution and ppi become significant when you wish to print photos. For example, let’s say you have a 12 megapixel camera. This means the photos you take will have 12 million pixels (4,000 pixels by 3,000 pixels). If you want high quality prints, your photos should have a resolution of 240-300 ppi. At a resolution of 240 ppi, your photos will print at a size of 16.6 inches (4,000/240) by 12.5 inches (3,000/240). At a resolution of 300 ppi, your photos will print at a size of 13.3 inches (4,000/300) by 10 inches (3,000/300). Notice how the print size of photos decreases as the ppi increases. Changing the ppi of images will change the sizes the images will print, which is why it’s referred to as “resizing.”
A Quick and Easy Way to Make a K-Drama Completion Status Table
Excel Mini-Tutorial

- Enter list of drama titles into column A.
- Enter list of number of episodes watched per drama into column B.
- Enter list of number of total episodes per drama into column C.
- To perform calculations with columns B and C, enter “=B1/C1” into the cell F1 or the function bar). The calculation for B1/C1 should appear in cell F1. Hover your mouse over the bottom right corner of cell F1 until the mouse icon turns into a cross. Drag the cross icon till you reach the bottom of the column. This should apply the function to all the entries in the column. Continue reading
